Today I learned a valuable lesson. Choosing plumbing tools based solely on what is attractive is a recipe for disaster. Buying them at Target may not be a good idea either.

So our toilet was clogged and I figured my trusty “toilet” plunger would save the day. I got it at Target when we moved, and it was blue with a white stand to hide the plunger part for a prettier effect. Wrong!
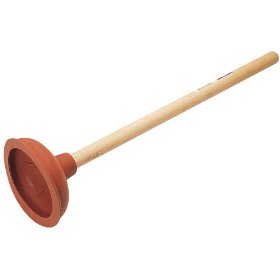
The plunger we had was similar to one in this photo, except the rubber was a dark blue, and it was so cheap that it would invert if you tried to use it, plus the rubber seemed incapable of forming a seal at the base of the toilet. Little did I know it’s not even made for toilets! It’s a SINK plunger! Sink plungers may work on some toilet bowls some of the time, because I unwittingly have used them before with results. Today my pretty sink plunger was not up to the task.

Fortunately my wonderful building owner lives in the building and had a toilet plunger, so I had the right tool thanks to her. It works like a charm when you actually have a TOILET plunger! Now I’ve bought our own at Home Depot, and even watched a cool instructional video I found with a quick search on youtube, so I am pretty much an expert at toilet plunging. Did you know that there is actually some technique to it? This youtube video from expert village does a very good job at demonstrating points 4 and 5, and mentions points 2 and 3 towards the end.
1. Check the photos here and make sure you own a real TOILET plunger. It is really worth the money, and if you don’t mind one with a bright yellow handle a proper toilet plunger is $4.99 at Home Depot. I bought ours, shown in this photo in front of the toilet, with a clever white case for $14.99 at Home Depot, not bad for esthetics AND function. Apparently real toilet plungers can also be used on sinks, so get it and you’ll be all set. I put my crappy Target sink plunger out by the dumpster today!
2. Have a bucket of water so that your test flushes are done by pouring water from the bucket into the toilet bowl to produce a flush. This way you can pour the water and control how much so you make sure you don’t overflow the bowl if your clog is still present. This is key. I wish I had known this today because all my test flushes were done the usual way with the toilet flush and I was just praying it wouldn’t overflow. That’s not cool. It was pretty nerve wracking.
3. Also use your bucket of water to make sure you have enough water in the bowl. You need a fair amount of water in order to get a good seal between your plunger and the hole at the base of the bowl. Sometimes if the toilet is clogged the water level goes too low, so if that’s the case you add water.
4. Empty the air out of the toilet plunger before using, as much as possible. This is done by tilting the plunger under water so that the air comes out. I saw several sources that said this is more effective to have the plunger thrust water rather than an air bubble.
5. Try to pull the clog up towards you rather than push it further into the toilet tubes. This is because the toilet tubes are long and narrow with tight curves, and ideally you don’t want to jam the clog further into those tubes. This means press down slowly then pull up with reasonable force and speed, to pull the clog out. Eventually most videos say plunging up and down a bunch is OK if the pulling up doesn’t do it. If you really want to geek out and watch another short video this one actually shows a cross section of a toilet so you can see how the tubes look. It also shows a “closet auger” tool you’ll need if the plunger doesn’t get rid of the clog. Optional viewing, for sure!
So there you have it folks. I was sooooo happy and relieved when our toilet was finally unclogged. Now for the rest of the day when I flush it makes me happy. Sometimes it takes some drama to get you to appreciate the little things, right? Oh and the other moral of this story is that between google searches and youtube videos you can learn anything.


